Crispy Oven Sweet Potato Fries (That Actually Stay Crispy!)
This post may contain affiliate links. Read my disclosure policy.

I have made sweet potato fries in the oven probably a hundred times. And for a long time, I kept getting the same disappointing result — soft, slightly soggy fries that were delicious in flavor but just did not have that satisfying crunch I was looking for. I tried higher temperatures. I tried different oils. I tried every tip I could find.
Then I discovered two things that changed everything: cornstarch and a wire rack. Together, these two simple tricks transformed my oven sweet potato fries from “pretty good” to genuinely crispy — the kind of crispy that makes you eat half the pan standing at the kitchen counter before they even make it to the table.
My kids ask for these at least once a week. They go with everything — burgers, grilled chicken, sandwiches, or honestly just on their own with a dipping sauce. Once you make them this way, you will never go back to the soggy version again.
Why You’ll Love These Sweet Potato Fries
- Actually crispy — the cornstarch trick creates a light coating that crisps up beautifully in the oven
- Healthier than deep fried — all the satisfaction with a fraction of the oil
- Only 6 ingredients — sweet potatoes, cornstarch, oil, and a few spices you already have
- Ready in 30 minutes — faster than a takeout run
- Naturally gluten-free and vegan — works for almost every dietary need
- Customizable seasoning — sweet, savory, or spicy — make them however you like
The Secret to Crispy Oven Sweet Potato Fries
Before we get into the recipe, let me explain why most oven sweet potato fries turn out soft — and how to fix it.
Problem 1: Sweet potatoes have a lot of moisture. That moisture turns to steam in the oven, which steams the fries instead of crisping them. The fix is cornstarch — it absorbs the surface moisture and creates a thin coating that crisps up when it hits the oven heat.
Problem 2: Overcrowding the pan. When fries are too close together, they steam each other instead of roasting. Every fry needs space around it so the hot air can circulate. Use two sheet pans if needed.
Problem 3: Cooking directly on the pan. The bottom of the fry sitting flat on metal gets soft and sometimes sticks. A wire rack set on top of the sheet pan lets air circulate all the way around each fry — top, bottom, and sides — for even crispiness all over.
These three things — cornstarch, space, and a wire rack — are the whole secret.

Ingredients You’ll Need
- 2 large sweet potatoes — look for long, uniform ones that are easy to cut into even sticks. The more even your cuts, the more evenly they cook.
- 2 tablespoons cornstarch — this is the non-negotiable crispy secret. Do not skip it and do not substitute flour — cornstarch works much better here.
- 2 tablespoons olive oil — or avocado oil. You want just enough to lightly coat every fry — too much oil makes them greasy, too little and they won’t crisp.
- 1 teaspoon garlic powder — adds a subtle savory depth that balances the natural sweetness of the potato.
- 1 teaspoon smoked paprika — smoky, slightly sweet, and beautiful color on the finished fry. Regular paprika works but smoked is so much better.
- ½ teaspoon salt — season before cooking. You can add more after if needed.
- ¼ teaspoon black pepper — just a little background heat.
Optional additions:
- ¼ teaspoon cayenne pepper for heat
- ½ teaspoon cumin for a warm earthiness
- 1 teaspoon Italian seasoning for an herb version
How to Make Crispy Oven Sweet Potato Fries — Step by Step
Step 1: Prep your sweet potatoes
Preheat your oven to 425°F (220°C). High heat is essential — lower temperatures produce soft fries.
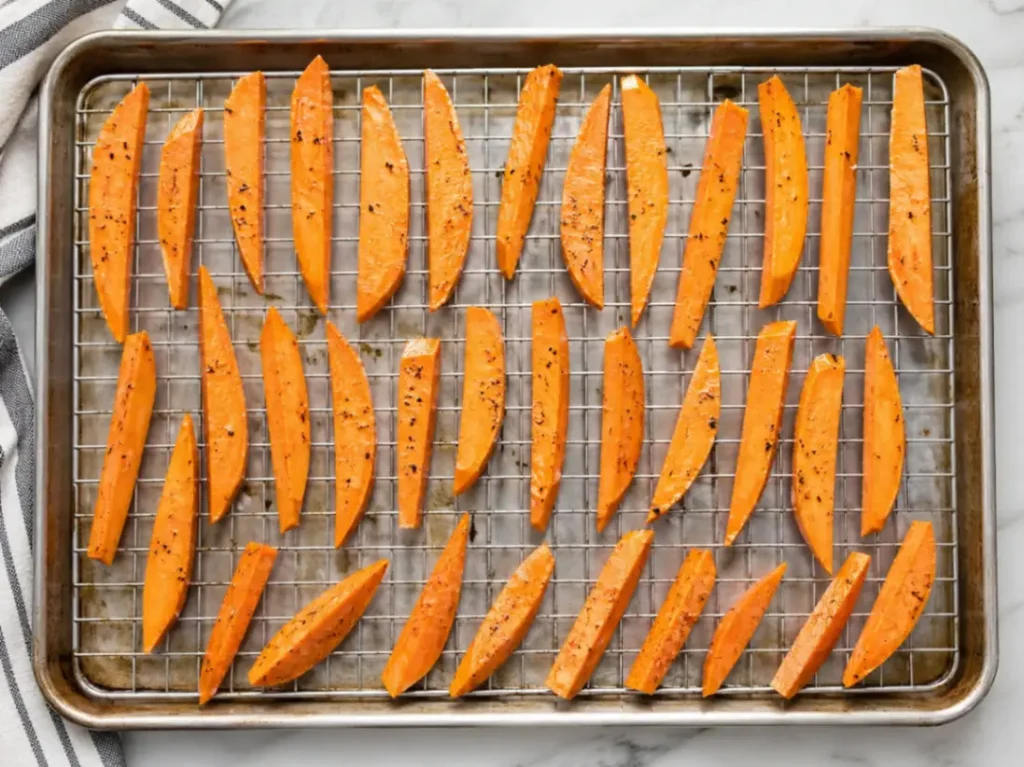
Line a large baking sheet with foil for easy cleanup, then set a wire rack on top. Spray the rack lightly with cooking spray so the fries don’t stick.
Peel the sweet potatoes and cut them into even sticks about ¼ inch thick. This is the most important prep step — uniform thickness means they all finish cooking at the same time. If some are thick and some are thin, the thin ones burn before the thick ones crisp up.
Cut the potato in half lengthwise first, then lay it flat and cut into planks, then cut the planks into sticks.

Step 2: Dry the fries thoroughly
Place the cut fries on a clean kitchen towel or a double layer of paper towels. Pat them completely dry — press down firmly. Remove as much surface moisture as possible. This step takes 2 minutes and makes a significant difference in the final crispiness.
Step 3: Toss with cornstarch
Transfer the dried fries to a large bowl. Sprinkle 2 tablespoons of cornstarch over them and toss well until every fry is lightly and evenly coated. You should see a faint white coating on the surface of each fry.
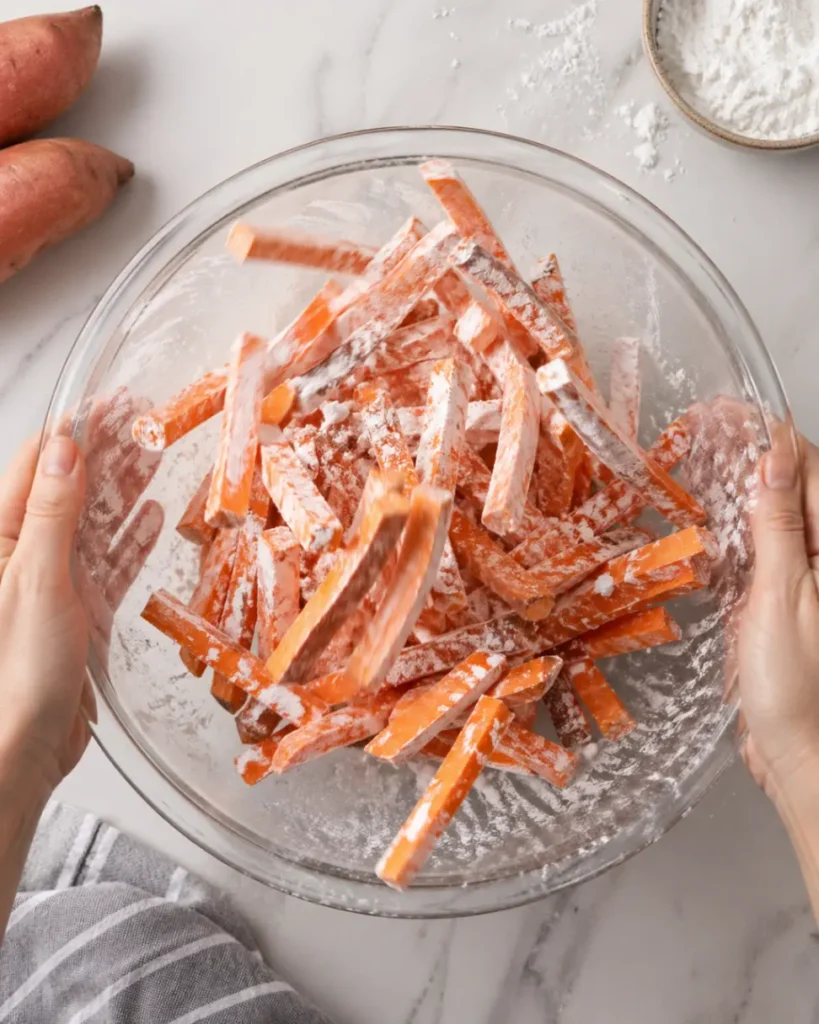
Step 4: Add oil and seasoning
Drizzle 2 tablespoons of olive oil over the cornstarch-coated fries. Toss again until evenly coated — the oil will help the spices stick and encourage browning.
Add the garlic powder, smoked paprika, salt, and black pepper. Toss one more time until every fry is evenly seasoned.
Step 5: Arrange on the wire rack
Arrange the fries in a single layer on the wire rack, making sure no fries are touching each other. This is critical — overlapping fries steam instead of crisp. If you have too many fries for one pan, use two sheet pans. Do not try to crowd them onto one.
Step 6: Bake — with a flip halfway
Bake at 425°F for 15 minutes. Remove from oven and use tongs to carefully flip every fry. Return to oven and bake for another 12 to 15 minutes, until the edges are golden brown and the fries feel firm and crispy when you tap them with tongs.
Keep a close eye during the last 5 minutes — sweet potatoes can go from perfectly crispy to burnt quickly at high heat because of their natural sugar content.

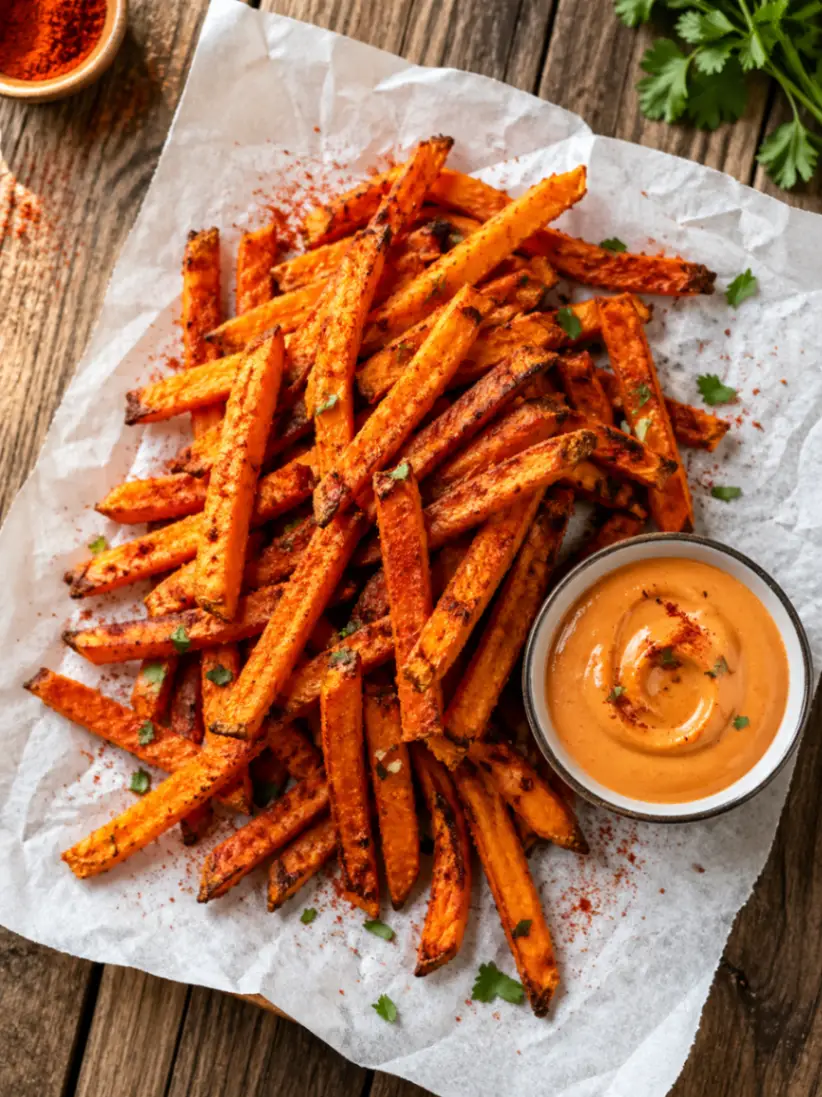
Step 7: Serve immediately
Transfer to a serving plate and season with a little extra salt if needed. Serve immediately — like all fries, these are at their absolute best straight from the oven. They will soften as they sit, so get them to the table fast.
Best Dipping Sauces for Sweet Potato Fries
The right dipping sauce takes these from great to unforgettable. Here are the best options:
Chipotle mayo — mix ½ cup mayonnaise with 1 to 2 teaspoons of chipotle in adobo sauce (blended smooth). Smoky, creamy, slightly spicy. The absolute best match for sweet potato fries.
Honey mustard — mix 2 tablespoons Dijon mustard with 1 tablespoon honey and 1 tablespoon mayo. The slight bitterness of the mustard balances the sweetness of the potato perfectly.
Garlic aioli — mix ½ cup mayo with 2 minced garlic cloves, 1 tablespoon lemon juice, and salt. Simple and classic.
Sriracha ranch — mix ranch dressing with a generous squeeze of Sriracha. Great for anyone who likes a little heat.
Simple ketchup — never wrong. A little classic never hurt anyone.

Tips for the Crispiest Results
Cut them as evenly as possible. A mandoline slicer makes this much easier if you have one. Even ¼-inch sticks are the goal. Thicker cuts take longer and may not crisp as well. Thinner cuts crisp faster but can burn.
Do not soak in water. Some recipes call for soaking sweet potato fries in cold water before cooking. Skip this step — sweet potatoes are starchy in a different way than regular potatoes and soaking actually adds moisture back that you are trying to remove. Dry the surface instead.
Use the wire rack. I know it is an extra thing to clean, but it genuinely makes the difference between crispy and soft. Air needs to circulate around the bottom of the fry. A flat pan does not allow this.
Do not open the oven too early. Let the fries cook undisturbed for the full 15 minutes before flipping. Opening the oven early releases heat and adds moisture, both of which work against crispiness.
Serve immediately. All oven fries soften as they sit — this is physics, not a failure. Plan to have your meal ready the moment the fries come out of the oven.
Seasoning Variations
Classic savory (the base recipe above) — garlic powder, smoked paprika, salt, pepper
Cinnamon sugar sweet potato fries — skip the savory spices and toss with 1 tablespoon sugar + ½ teaspoon cinnamon + ¼ teaspoon salt after baking. Serve with honey or maple syrup for dipping.
Cajun fries — add ½ teaspoon cayenne, ½ teaspoon onion powder, and ¼ teaspoon dried oregano to the base seasoning. Spicy and delicious.
Parmesan herb fries — after baking, immediately toss with 2 tablespoons finely grated Parmesan and 1 teaspoon dried Italian herbs. The heat from the fries melts the cheese slightly. So good.
Chili lime fries — add ½ teaspoon chili powder and squeeze fresh lime juice over the finished fries. Bright, zesty, and different.
What to Serve with Sweet Potato Fries
These fries are the perfect side dish for almost any meal:
- Burgers — classic pairing, works every time
- Grilled or baked chicken — a healthier plate that still feels indulgent
- BBQ pulled pork sandwiches — the sweetness of the fries plays beautifully against tangy BBQ sauce
- Fish tacos — a little unexpected but absolutely delicious
- Black bean burgers — keeps the whole meal plant-based
- Hot dogs — fun weeknight dinner the whole family loves
- As a snack — honestly, just on their own with dipping sauce is reason enough
How to Store and Reheat
Storage: Store leftover fries in an airtight container in the refrigerator for up to 3 days. Be aware that they will lose their crispiness in storage — this is unavoidable.
Reheating to restore crispiness: The best method is the oven or air fryer. Spread cold fries on a wire rack on a baking sheet and bake at 400°F for 8 to 10 minutes until re-crisped. The microwave will make them soft and a bit rubbery — avoid it for reheating if crispiness matters to you.
Air fryer reheating: 375°F for 4 to 5 minutes. Works great.
Freezing: Not recommended. Sweet potato fries do not freeze and reheat well — the texture becomes very soft and watery after freezing.
Frequently Asked Questions
Why are my sweet potato fries not crispy? The most common reasons are: too much moisture on the surface before cooking, skipping the cornstarch, overcrowding the pan, or not using a wire rack. Address all four of these and you will get crispy fries every time.
Can I use an air fryer instead? Yes — air fryer sweet potato fries are excellent. Follow the same prep steps (dry, cornstarch, oil, season). Air fry at 380°F for 12 to 15 minutes, shaking the basket every 5 minutes. Cook in batches — do not overcrowd the air fryer basket.
Do I have to peel the sweet potatoes? No — sweet potato skin is edible and nutritious. If you leave the skin on, scrub the potatoes well and make sure the skin is smooth. The fries will have a slightly more rustic look which many people prefer.
Can I make these ahead of time? You can cut and season them up to a few hours ahead and keep them in the fridge. But bake them fresh — reheated fries never quite match freshly baked ones.
What if I don’t have a wire rack? You can bake them directly on a foil-lined sheet pan. They will still be good — just flip them more carefully and make sure there is plenty of space between each fry. The bottom will be slightly less crispy but the top will still brown nicely.
Are sweet potato fries healthier than regular fries? Sweet potatoes have more fiber, more vitamin A, and a slightly lower glycemic index than white potatoes. Baking instead of frying significantly reduces the fat content. So yes — these are a genuinely healthier alternative to deep-fried fries.
My fries are burning on the edges but soft in the middle — what went wrong? Your fries are cut too thick. Aim for ¼ inch — no thicker. Thick cuts need lower heat for longer, which doesn’t crisp the outside the same way.
Seeing this beautiful post on Instagram was the nudge I needed to finally perfect my own crispy sweet potato fries recipe. Sometimes the best cooking inspiration comes from the most unexpected places!
More Side Dish Recipes You’ll Love
- Garlic Butter Roasted Potatoes
- Crispy Baked Onion Rings
- Honey Roasted Carrots
- Air Fryer Zucchini Fries
- Parmesan Roasted Broccoli

Crispy Oven Sweet Potato Fries
Ingredients
- 2 large sweet potatoes peeled and cut into ¼-inch sticks
- 2 tablespoons cornstarch
- 2 tablespoons olive oil
- 1 teaspoon garlic powder
- 1 teaspoon smoked paprika
- ½ teaspoon salt
- ¼ teaspoon black pepper
Instructions
- Preheat oven to 425°F (220°C). Place a wire rack on a foil-lined baking sheet and spray lightly with cooking spray.
- Peel sweet potatoes and cut into even ¼-inch sticks. Pat completely dry with paper towels.
- Place dried fries in a large bowl. Sprinkle cornstarch over and toss until every fry is lightly coated.
- Drizzle olive oil over fries and toss to coat. Add garlic powder, smoked paprika, salt, and pepper. Toss again until evenly seasoned.
- Arrange fries in a single layer on the wire rack, making sure no fries are touching.
- Bake for 15 minutes. Flip each fry with tongs. Return to oven and bake for another 12 to 15 minutes until golden and crispy.
- Serve immediately with your favorite dipping sauce.
Notes
- Air fryer: 380°F for 12 to 15 minutes, shaking every 5 minutes. Cook in batches.
- No wire rack: Bake directly on foil-lined pan — still good, just flip carefully.
- Cinnamon sugar version: Replace savory spices with 1 tablespoon sugar + ½ teaspoon cinnamon. Add after baking.
- Storage: Refrigerate up to 3 days. Reheat in oven at 400°F for 8 to 10 minutes to restore crispiness.
- Key tip: Do not skip the cornstarch and do not overcrowd the pan. These two things make the biggest difference.
Nutrition (per serving, estimated)
| Calories | 180 kcal |
| Carbohydrates | 32g |
| Protein | 2g |
| Fat | 7g |
| Saturated Fat | 1g |
| Sodium | 340mg |
| Fiber | 4g |
| Sugar | 7g |
| Vitamin A | 184% DV |
Did you make this recipe? Leave a star rating and tell me how it turned out! I love seeing your creations.

Sarah Mitchell is the home cook and recipe developer behind Kitchen Love Story, a food blog dedicated to easy, comforting recipes that real families actually love. After years of searching for simple weeknight dinner ideas that didn’t require a culinary degree or a grocery list a mile long, Sarah decided to start creating and sharing her own. Her recipes focus on accessible ingredients, straightforward techniques, and big, satisfying flavors — the kind of food that brings people together. When she’s not testing recipes in her kitchen, Sarah enjoys meal prepping on Sundays, exploring farmers markets, and convincing her family to try at least one new dish a week. She lives with her family and a very enthusiastic golden retriever who considers himself the official taste tester.